Are you struggling to see your orchids flourish? If you’re finding that they’re not thriving as you’d hoped, it might be time to try a new approach to ensure they stay healthy and bloom throughout the year. I’m about to share a little-known secret that could transform your orchid care routine.
Have you ever wondered how to speed up the growth of your orchids and keep them from succumbing to rot? There’s a specific method you should follow, and I’m here to guide you through it. Get ready for a game-changing tip that will breathe new life into your orchids. You’ll be grateful for this advice that’s set to rescue your beloved plants.
Orchid, the most delicate plant to take care of
Choosing to welcome a plant into your home is a commitment akin to bringing home a new puppy: it’s a promise of ongoing care and attention. These verdant treasures embody the green essence of our planet and become a living, breathing part of your living space, representing the heart of nature right within your own four walls.

Having a little slice of nature on your balcony, terrace, or brightening up the more neglected corners of your home can be truly delightful. However, tending to these plants isn’t always as straightforward as it might seem, particularly for those who haven’t naturally inherited the proverbial green thumb.
Orchids, in particular, are notorious for being a bit tricky to care for. They’re stunning, with their vibrant colors and exquisite blooms, making them a popular choice for plant enthusiasts and a cherished gift for friends and loved ones. But, they are also known for being somewhat temperamental, often wilting away or stubbornly refusing to flower at the expected times.
If you’re facing these issues, it’s a sign that something in your care routine might be amiss. Have you noticed your orchids wilting, rotting, or not blooming as they should? Don’t worry, you’re about to learn a simple yet effective trick that could turn things around for your precious plants in no time. Keep reading, and I’ll share the secret to giving your orchids a new lease on life.
The technique for having flowering and healthy orchids
Caring for orchids can be a bit of a complex dance, as these beauties have their own set of rules for growth. Their roots, in particular, are prone to rot if not given the right attention and environment. Is this the challenge you’re facing with your orchids? Fear not, because there’s a clever strategy that can help you cultivate flourishing, healthy orchids throughout the year.
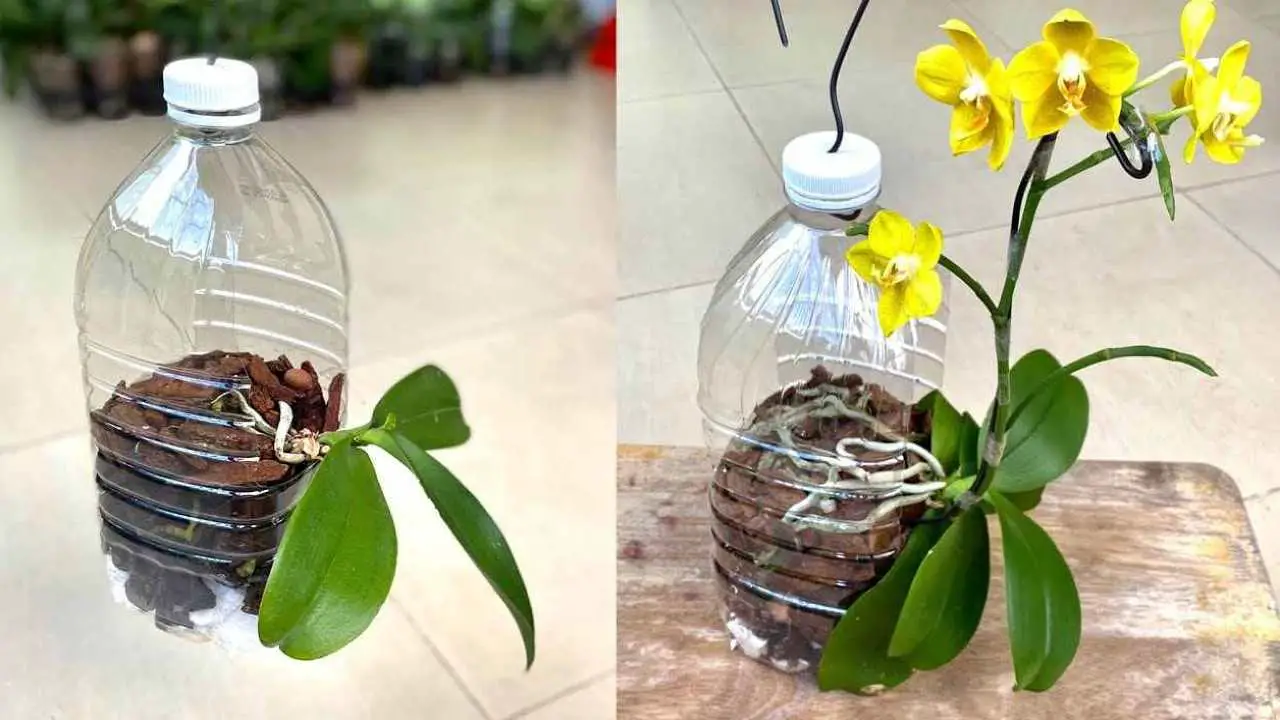
To start, you’ll need a 5-liter plastic bottle. Remove the cap and cut a large square opening in the side—big enough for your orchid to fit through comfortably.
Next, create drainage holes at the bottom of the bottle using a small knife. If you’d like to hang your orchid, you can also make holes in the bottle cap, thread a wire or a hanger through it, and create a hanging planter for a touch of aerial beauty on your balcony.
Now, gently remove your orchid from its current pot, shaking off the old planting material and snipping away any damaged roots. While you’re doing this, let’s whip up a natural, antiseptic fertilizer that will do wonders for your plant.
In a bowl, mix 500 ml of water with two cloves of crushed garlic. This concoction will harness the antiseptic properties of garlic. After mixing well, strain the solution to remove the garlic pieces. Dip a cotton ball into this garlic-infused water and gently wipe down the orchid’s leaves. This step is crucial as garlic’s natural fungicidal properties will help protect your plant from fungal infections.
Next, immerse the orchid roots in the garlic water solution for about 15 minutes. This will give the roots a good antiseptic soak. Meanwhile, prepare some pine bark, which you can find at your local nursery.
For the final assembly, take your prepped plastic bottle and place a layer of small sponge pieces at the bottom—these can be the typical green or white sponges from a florist or supermarket.
Now, add a layer of pine bark, then carefully place your orchid inside, making sure it’s snug. Cover the roots with more pine bark to secure the plant in place. Water the orchid using the same garlic water solution, ensuring the roots get a good drink.
This process should be repeated every two weeks. By following these steps, you’ll create an ideal environment for your orchid to not only survive but thrive, with robust roots and a spectacular display of blooms all year round.